


Look at these fun sliders for your journals. Planner Essentials Slider Pockets #31 They are marketed as planner essentials, however they can very easily be used for any application you can imagine. Slider pockets for your planner, junk journal or scrapbook page! Cut them apart to use just one. Reconfigure your orientation so they pull up instead of out.


The die set comes with many different pieces. It took longer to sort and cut than it did to actually assemble. I mooned over several different types of paper. See my recommendations about that in the notes. This is the basic walk through with photos to help illustrate .
Warning you might find this as addictive as I did, so be prepared.


 Slide your remaining tags into the slots. Above is shown for right hand facing. See below for other samples with double pages. Tags to open as shown.


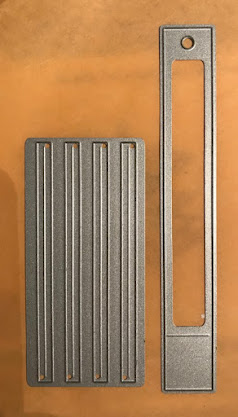
2.}parts you will need to construct this page:

One base page {shown above} to adhere your sliders to. Note that die was sold in a Planner Essentials Globe #28. I used the tattered edge page die. With a bit of manipulating, I bypassed the tattered edge to make a straight edge. I just trimmed and tucked the edge under my die so that it did not get cut off and remained a straight edge. This can be trimmed for an exact fit later.

One frame page {shown above}cut out page: Decide if you want your holes so your page opens to left hand visual or right hand visual and cut accordingly.

6 Tiny strips {shown above} with a fold line in the middle NOTE: You will cut the die once to get 4 and then half of it again to get the other 2 strips. Fold these carefully so you don't bow them. Cut one of the larger slide pull with fold. See photos below for orientation shown in dark brown. You can use scrap pieces for the tiny strips. The larger pull will show so be aware.
Three Tag inserts as shown below,

~1 slides to either left or right hand pull
This is a tag that slides and has a catch at the bottom.
NOTE: when you insert this piece you do it before you bind your book. it goes in through the hole side.
~2 is a window that does not move, but opens
~3 uses pull strip folded under and glued on top as shown with wider strip for tag pull

Note: the only way to have a left hand pull on this is to orient it in the middle opening of your frame. Or to have the pull on the outside of the facing page, not the hole side.
3.} Be mindful of your orientation if you are using pattern specific papers. Maybe mark Up and Down on your back sides so you can see at a glance which way is up.
When adding the small strips, orient the opening fold to the window opening on all windows.
This will act as a slider stop for your tags.

Place a thin double sided tape on either side of the stitched lines as follows:
Single-double-double-single This will correspond to adhere the tiny strips.
Place the tape carefully then adhere the tiny strips
Fold the top, bottom and tabs on creases to the back side {shown} of the window cut
add double sided tape to these as well both sides of each tab.
Place more double sided tape on the top of each strip as above
IMPORTANT next step below:

Above shows the back side placement of the window in the center slot. Decide which space you want for which slider. Use double sided tape on all 4 sides on your cutout frame. Then carefully center and place down. This is a very important part. Check your orientation before you adhere your double opening window tag before you go any further.

Front close up view of that window
After you place that window. Remove all your double sided tape protection.
Fold Top, Bottom, Tabs into the back of your page and secure, add more double sided
tape as needed. Now you will carefully line up the holes on your base piece with your windows opening piece and glue together. Press firmly along all edges.
View from the front after everything is stuck in place


For the sample below, I used the pattern on the paper for my tags. You can option to decorate under and over all tags as well as the base page with words, photos, stories. The possibilities are limited only by your imagination.

Approximate paper needs: Count on using 2@ 12 x 12 sheets of heavy paper or cardstock. You can use 8-1/2 x 11 depending on your patterns. The ECD die-cut packs come with many extras and you will want to cut them all and use them to embellish your journals.
Paper shown Archivist by Prima
Base page 5-1/2" x 8-1/2" If you don't have the die cutter for this, you can just cut an approximate size then trim and punch by hand after you adhere the slider page.
Slider cut out page approximate size 6-1/2" x 9-1/2"
Thanks Pinterest going to turn 2020 planner into a Junk Journal!
Die's Used in this project


3 comments:
Super fun!!! Thanks for the tutorial!!
Ok, omg, I get it, finally! Thanks for sharing the step outs with lots of photos!
Ok, omg, I get it, finally! Thanks for sharing the step outs with lots of photos!
Post a Comment