Now that the 'Do it yourself' border ideas are taken care of. Have a look at the things you may have in your stash and think of them with fresh eyes. Above and below take a look at your edger's as well as any decorative border die. You could even use a punch to punch an edge.
These are just the template punches to illustrate how they could look stacked.
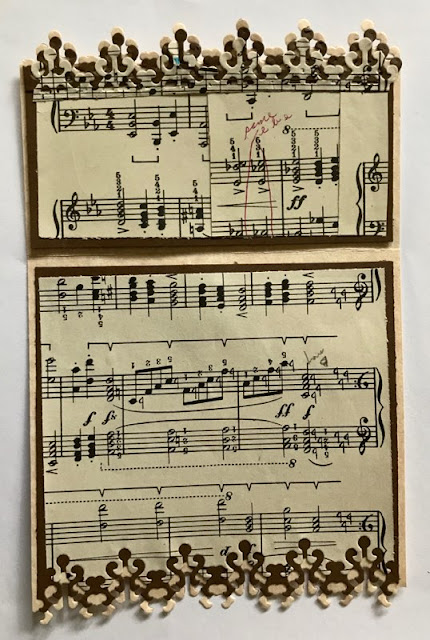
Below is the rough stack for a card I am working on using this border die.
Use this formula to create card background as in sample photos above and below
Decide on the edge you want to make {adjust height size of card accordingly}
1} Choose 3 coordinating papers
2} -Cut a 5 inch wide piece by 10 inches long as your base piece
- mark down the l0 inch side the at 2-1/2 inches and score at 7 inches
-your top piece, the face of your card will be the largest with the fancy edge along the top and the bottom.
-the score indicates where you will be eventually separating your work to
form a double face art piece to place in your Rolo
-Cut middle layer approximately 1/8th inch smaller all the way around
- further separate inside paper at the score line and trim so it nests slightly smaller all the way around on both pieces
-Cut final inside layer approximately 1/8 inch smaller all the way around for both pieces as well.
3} Now cut a border, either by hand or as in photo using a die cut
- Cut 2 of each paper for a total of 6
4} Dry fit all pieces before you assemble and glue noting the borders on each
piece. Do one layer at a time so they stack consecutively.
5} Nest them to echo the background each layer slightly smaller than the one before.

These are just the template punches to illustrate how they could look stacked.
If your edge is too long, just trim it. If it is too small, just punch more and fit them together.
Remember you will be cutting 2 complete sets of 3 coordinating layers for each double faced card. You can cut more than one layer at a time if your die will allow it. Trim away what you don't need to form your edgesBelow is the rough stack for a card I am working on using this border die.
Decide on the edge you want to make {adjust height size of card accordingly}
1} Choose 3 coordinating papers
2} -Cut a 5 inch wide piece by 10 inches long as your base piece
- mark down the l0 inch side the at 2-1/2 inches and score at 7 inches
-your top piece, the face of your card will be the largest with the fancy edge along the top and the bottom.
-the score indicates where you will be eventually separating your work to
form a double face art piece to place in your Rolo
-Cut middle layer approximately 1/8th inch smaller all the way around
- further separate inside paper at the score line and trim so it nests slightly smaller all the way around on both pieces
-Cut final inside layer approximately 1/8 inch smaller all the way around for both pieces as well.
3} Now cut a border, either by hand or as in photo using a die cut
- Cut 2 of each paper for a total of 6
4} Dry fit all pieces before you assemble and glue noting the borders on each
piece. Do one layer at a time so they stack consecutively.
5} Nest them to echo the background each layer slightly smaller than the one before.
Above is the basic background. I like to create using both pieces as a single unit. Separating and punching last.
Above is a work in progress, It has ribbon and the paper doll I will be adding
This card edge is cut using the border die shown in top sample as green and mauve sample
I am excited to further explore the making of 'New Fancy Edge Rolo's'


1 comment:
I love the layered die-cuts! Thanks for sharing your process!
Post a Comment