Bo Bunny Banner Year. See details below
After stamping addition below
The spine was made with a sturdy cardstock cut as the same width as your book. Scored at 1/2" - 1/2"- 1/4" repeat, you may have to piece two strips together to do your entire 12 pages with covers. Once you have enough scored, fold with a folding tool. Then secure the 1/2 inch measurements back to back. You will secure the spine as you go between the chipboard base and the wallpaper base.
To make your pages cut 13 chipboard pieces at 6" x 6" Secure one piece to each spine carefully to form the book base.
This is the detail of each 'background page'
NOTE: the top flap on the left hand side and the side flap on the right.
You will make these flaps out of the same cardstock as your background page covering.
For each month you will need 2 sheets of 8-1/2 x 11
NOTE: This size works best as you will have left over pieces to use as matting for photos or inserts
Cut two @ 6" x 6" or to fit each page at full coverage
Cut two flaps:
one @ 1" x 5 score at 1/2 " fold
one @ 1" x 4-1/2 score at 1/2 " fold
Cut two @ approximately 7" x 2-1/2"
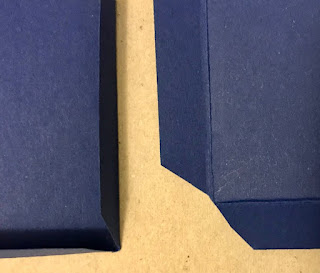
Score along sides and bottom at 1/2" This will form the pockets along the bottom of each page.
Trim your pocket corners so when you close them they will lay flatter.
Secure one to each side on the bottom. You may have to adjust the fit on one side to have them fit perfectly.
Each month has an identical sheet of cut outs.
Cut them completely apart.
Ink all edges of each piece before gluing down.
Journaling attaches to flap on top left, month to flap on right hand side.
Tag detail. cut one slightly bigger of background paper and one slightly smaller of white or crème paper. Assemble as one unit, journal, special note, quotes on the inside of tag.
Above is the plain shot. To dress them up a bit, find a stamp you like and stamp away. This is just a background, you will be adding in your month by month details later. You can add in photos under each flap. Really make it your own.
After above
Before below
Use little bits to make a matchbook tuck in.
Continue with the same basic process for all months
Each month will have an extra journal card I created with a stamp. This way you can make note of your special dates to remember. they are stamped both sides for a total of 32 lines. This will certainly cover each day of the month.
Don't forget to consider the back sides of this gorgeous paper in case you like it better.
More inner details to come. I think I will use this as a month in review for 2019. I will add stories, notes and photos to each month.


1 comment:
Wow what a fantastic project Pam!! As the holiday approaches, I'd like to this opportunity to wish you a Merry Christmas, and a Blessed 2019!
Post a Comment